1. Pre-Installation: requirements and Anti-Virus products supported
1.1 Server and Agent Handler requirements
Free disk space | 1 GB minimum (first-time installation); 1.5 GB minimum (upgrade); 2 GB recommended |
Memory | 1 GB available RAM; 2–4 GB recommended. |
Processor | Intel Pentium III-class or higher; 1 GHz or higher. |
Monitor | 1024x768, 256-color, VGA monitor. |
NIC | Network interface card; 100 MB or higher. |
Dedicated server | If managing more than 250 computers, McAfee recommends using a dedicated server. |
File system | NTFS (NT file system) partition recommended. |
IP address | McAfee recommends using static IP addresses for ePolicy servers. |
Server-class OS | 32bit or 64bit • Windows Server 2003 Enterprise with Service Pack 2 or later • Windows Server 2003 Standard with Service Pack 2 or later • Windows Server 2003 Web with Service Pack 2 or later • Windows Server 2003 R2 Enterprise with Service Pack 2 or later • Windows Server 2003 R2 Standard with Service Pack 2 or later • Windows Server 2008 |
Browser | • Firefox 3.0 (do not support Firefox 3.6) • Microsoft Internet Explorer 7.0 or 8.0 |
Domain controllers | The server must have a trust relationship with the Primary Domain Controller (PDC) on the network. For instructions, see the Microsoft product documentation. |
Security software | • Install and/or update the anti-virus software on the ePolicy Orchestrator server and scan for viruses. • Install and/or update firewall software on the ePolicy Orchestrator server. |
Ports | McAfee recommends avoiding the use of Port 8443 for HTTPS communication. Although this is the default port, it is also the primary port used by many web-based activities, is a popular target for malicious exploitation, and it is likely to be disabled by the system administrator in response to a security violation or outbreak. |
1.2 Database requirements
Databases supported | • SQL Server 2005 Express. (This database is included with ePolicy Orchestrator for use in environments where there is no supported database available.) • SQL Server 2005. • SQL Server 2008 Express. • SQL Server 2008. |
1.3 Distributed repositories requirements
Free disk space | 400 MB on the drive where the repository is stored. |
Memory | 256 MB minimum. |
Possible hosts | • HTTP-compliant servers on Microsoft Windows, Linux, or Novell NetWare operating systems • Windows, Linux, or NetWare FTP servers • Windows, Linux, or UNIX Samba UNC shares • Computer with a SuperAgent installed on it |
1.4 Supported products and components
products and components supported | • McAfee Agent 4.0 for Email and Web Security • McAfee Agent 4.0 for HP-UX • McAfee Agent 4.0 for Linux • McAfee Agent 4.0 for Macintosh • McAfee Agent 4.0 for Solaris • McAfee Agent 4.5 • McAfee Agent for Windows Patch 1 and Patch 2 • McAfee Common Management Agent 3.7 Patch 1 • McAfee Common Management Agent MA 3.6 Patch 4 • McAfee Data Loss Prevention 2.1 Patch 2 • McAfee Data Loss Prevention 2.2 • McAfee Data Loss Prevention 3.0 • McAfee Email and Web Security 5.1 Appliance • McAfee Endpoint Encryption 5.2.1 • McAfee Endpoint Encryption 5.3 • McAfee Endpoint Encryption Files/Folders 3.1 (EEFF) • McAfee Endpoint Encryption Files/Folders 4.x (EEFF) • McAfee Endpoint Encryption for Mobile 3.0 (EEMO) • McAfee Foundstone 6.5.3 • McAfee GroupShield for Domino 7.0 • McAfee GroupShield for Exchange 6.0.2 with SKE • McAfee GroupShield for Exchange 7.0 • McAfee GroupShield for Exchange 7.0 SP 1 • McAfee Host Intrusion Prevention 6.1 Patch 3 • McAfee Host Intrusion Prevention 7.0 Patch 3 • McAfee Host Intrusion Prevention 7.1 • McAfee IntruShield 4.1 • McAfee IntruShield 5.1 • McAfee LinuxShield 1.5.1 • McAfee Network Access Control 3.1 • McAfee Policy Auditor 5.1 (Feyman) |
products and components supported | • McAfee PortalShield 2.0 Patch 1 • McAfee Quarantine Manager 6.0 • McAfee Rogue System Detection 2.0 Patch 2 • McAfee Security for Lotus Domino Linux 7.5 • McAfee Security for Macintosh v1.0 • McAfee SiteAdvisor Enterprise 1.6 • McAfee SiteAdvisor Enterprise 2.0+ • McAfee SiteAdvisor Enterprise 3.0 • McAfee VirusScan 8.5i with McAfee AntiSpyware Enterprise • McAfee VirusScan 8.7 with McAfee AntiSpyware Enterprise • McAfee VirusScan Advanced Server (NetApp) • McAfee VirusScan Advanced Server (SAP) • McAfee VirusScan Advanced Server (Virtualization) • McAfee VirusScan for Macintosh 8.6.1 • Symantec SAV 10.x • Symantec SAV 9.x • USB Device 1.0 (EEV) • Vdisk 4.1 (EEV) • Vdisk for Macintosh 1.0 |
2. Installation Procedures
2.1 Using an account with local administrator permissions, log on to the Windows server computer to be used as the ePolicy server.
2.2 Run the Setup program.
• From software downloaded from the McAfee website: go to the location containing the extracted files and double-click Setup.exe. The executable is located in the file EPOLICY 4.5.0 .zip. Be certain to extract the contents of the zip file to a temporary location. Do not attempt to run Setup.exe without first extracting the contents of the zip file.
NOTE: If any prerequisite software is missing from the installation target computer, a list of those items appears.
2.3 Click Next. The installation process for each software item not listed as Optional begins automatically.
If you intend to use an existing instance of SQL Server 2005, or SQL 2008, you can continue without selecting the checkbox for installation of SQL Server 2005 Express.
If you do not have a supported version of SQL or MSDE, take one of the following actions:
• Install SQL 2005 or 2008 on a server.
If you are installing ePolicy Orchestrator with SQL 2005, the SQL Browser must be enabled or you cannot complete the installation wizard.
• Install SQL Server 2005 Express on the same computer where you are installing ePolicy Orchestrator. If you selected the checkbox for installation of SQL Server 2005 Express, ePolicy Orchestrator installs the database automatically.
If you are installing SQL Server 2005 Express, you might be prompted to install SQL Server 2005 Backward Compatibility. You must install it.
NOTE: It is highly recommended to install SQL Server on the same computer with ePolicy Server.
2.4 In the Welcome page of the installation wizard, click Next. The License Key page appears.
NOTE: License Keys are distributed from the same McAfee website from which the ePolicy Orchestrator software is downloaded.
2.5 Select whether you are installing based on a license key or installing an evaluation version.
• If you have a License Key, type its number here.
• If you select License Key but do not type its number you are asked if you want to install an evaluation version. Click OK to proceed with installation of the evaluation version, or Cancel to return to the previous page.
2.6 If you are installing a beta version of the software, the Beta test information box appears. Click OK.
2.7 Accept the End User License Agreement, and then click OK to continue. The Choose Destination Location dialog box appears. Click Next.
2.8 Accept the default installation path or click Browse to select or create a different location, then click Next.
If installing on a cluster server, the Set Database and Virtual Server Settings dialog box appears. Otherwise the Set Administrator Information dialog box appears.
2.9 Type and verify the password for logging on to this ePolicy Orchestrator server, then click Next.
If your environment employs Microsoft Cluster Server (MSCS) for a high availability system that ensures failover support, the Set Database and Virtual Server Settings dialog box appears.
2.10 In the Set Database Information dialog box, identify the type of account and authentication details that the ePolicy server will use to access the database server:
a. Use the drop-down list to select a database server. If SQL Express was installed, the name of the database is \EPOLICYSERVER.
b. Select the type of authentication, and then click Next.
• Windows authentication (recommended) — Specify the NetBIOS name of the Domain associated with the desired domain administrator user account. Then, provide and verify a password.
NOTE: If the database identification fails, type 1433 or 1434 in the SQL server TCP port field.
• SQL authentication — Provide the User name that the ePolicy Orchestrator software will use to access the database, then provide a password. If the installer cannot identify the port used for communication to and from the server, you might be prompted to provide that information.
NOTE: The ePolicy Orchestrator account must have ownership to the database.
2.11 Set the HTTP Configuration. Designate the port to be used by each function, and then click Next.
NOTE: Client firewalls block communication from the ePolicy server. Ensure that the ports required for communication from the ePolicy server are available on the client.
2.12 Optional step (can be performed after ePolicy Orchestrator is up-and-running). In the Default Notification Email Address dialog box, type the email address of the recipient of messages from ePolicy Orchestrator notification or leave the default. For a new recipient, complete these options, then click Next.
a. Provide a default destination for messages.
b. Select Setup email server settings now. However, if you choose Setup email server settings later, leave the default address.
c. Type the Fully Qualified Domain Name (FQDN) of the mail server and specify the Port to use for email.
d. Select This server requires authentication if needed, then type the User name and Password required to access the server.
2.13 In the Start Copying Files dialog box, click Next to begin the installation.
2.14 In the Installation Complete dialog box, you can view the Release Notes, launch ePolicy Orchestrator, or click Finish to complete the installation.
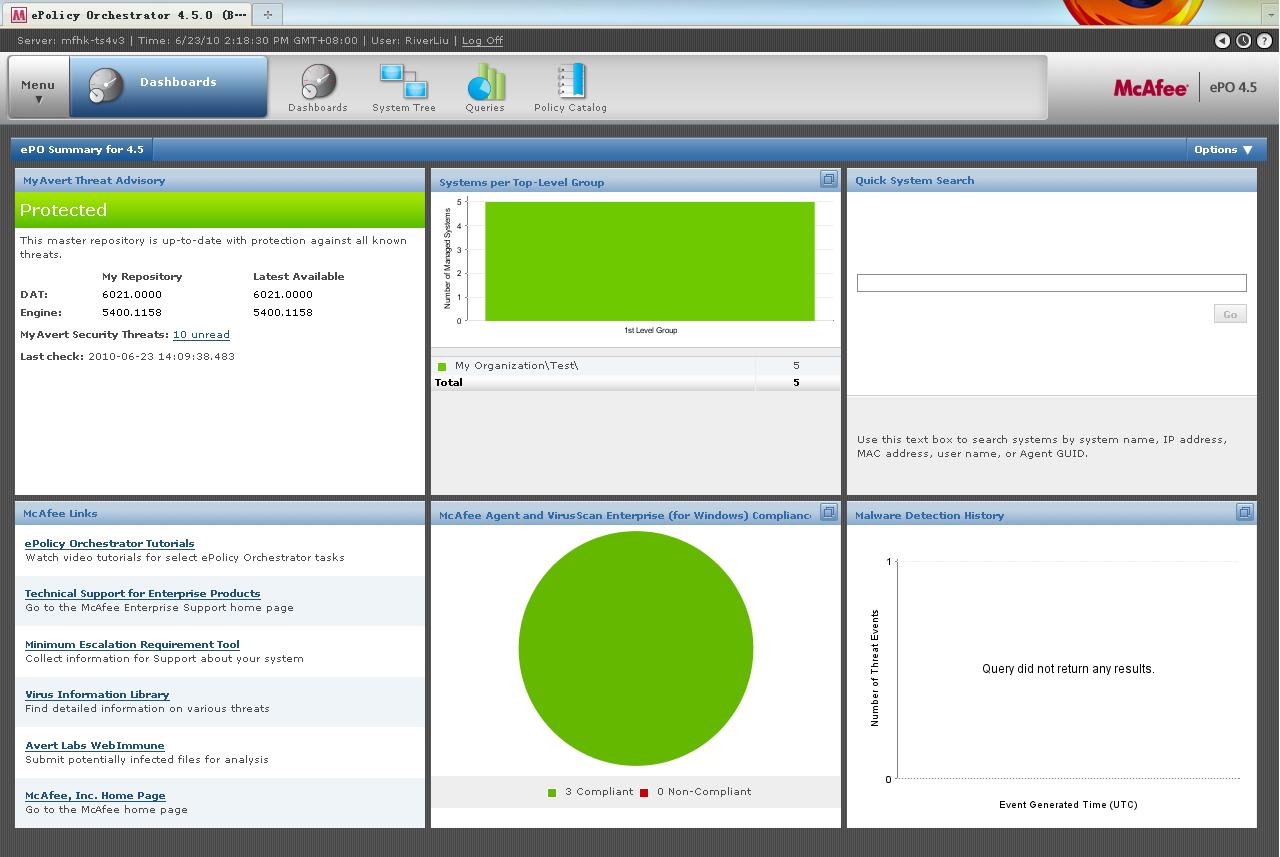
3. Completion of Installation
After launching the ePolicy Orchestrator, the following interface would be shown.
NOTE: IE 7, IE 8 or Firefox 3.0 should be used to view the interface.
4. References
McAfee, Inc., McAfee ePolicy Orchestrator 4.5 Installation Guide, 2009
McAfee, Inc., McAfee ePolicy Orchestrator 4.5 Product Guide, 2009